STEP 1:
Provide your website’s URL.
Provide your website’s URL.
After signing up, you’ll have to provide your website’s URL. Once this is done, we’ll generate a unique tracking code for you which has to be implemented in your site.
If you’d like to add any more websites in the future, you have to follow the same simple process.
STEP 2:
Install Leadberry’s Tracking Code.
Install Leadberry’s Tracking Code.
- OPTION 1: You can add Leadberry’s tracking code directly to your website header
- OPTION 2: You can use Google Tag Manager
- OPTION 3: Wordpress sites can use a plugin
- OPTION 4: WIX sites are supported too
Once at least one site is connected to Leadberry, navigate to settings (little gear icon in the upper right corner).
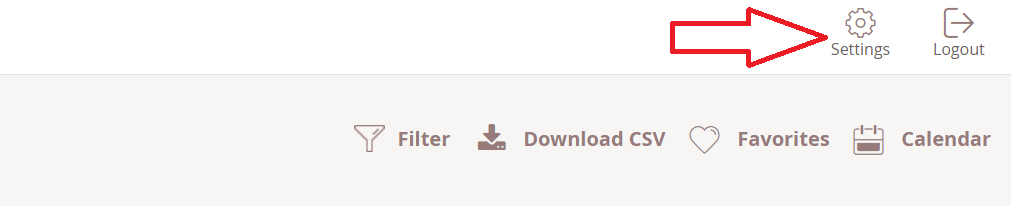
Select the “Tracking codes” tab.

Select the site you’d like to add the tracking code to from the dropdown menu.
After doing so, a unique tracking code will be generated for your site.
OPTION 1: PLACE THE SCRIPT DIRECTLY TO YOUR WEBSITE HEADER
Copy it from Leadberry and paste it next to the </head> tag of your site.
OPTION 2: USE GOOGLE TAG MANAGER
If you use Google Tag manager, please follow the below steps:
- 1. Open the Tag Manager Console
- 2. Go to Tags
- 3. Select “New”
- 4. Select “Custom HTML”
- 5. Paste Leadberry’s tracking code there
- 6. Create the same trigger as you would for any other tracking snippet
OPTION 3: USE A WORDPRESS PLUGIN
- 1. From your WordPress dashboard, select Plugins and click “Add New”
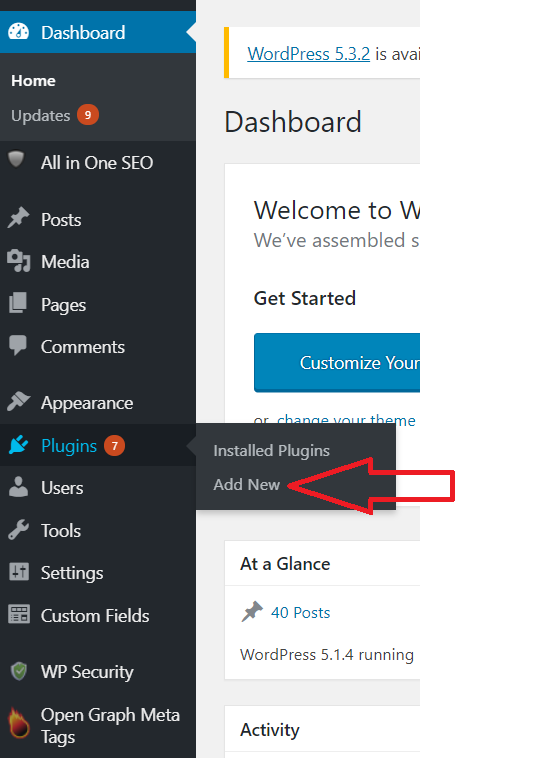
2. After that, you’ll see some listed plugins. You can search for new ones as well. Please search for one that allows you to insert scripts above the closing body tag sections or above the footer of your site. Note: The H&F plugin is a good choice, go for that one if possible.- 3. Activate the plugin on the “Plugins” pages.
- 4. After activating the plugin, navigate to the plugin’s settings. Insert the Leadberry tracking code to the header or footer section of the desktop area. Hit save!
OPTION 4: ADD THE TRACKING SCRIPT TO YOUR WIX SITE
For detailed instructions and tips please see WIX support on installing custom codes to your WIX site.
That was all, you’re done installing Leadberry! Wish you hot leads! :)
EXTRA HINTS
You can always check if the tracking code is working right with the “Check Install” button under settings/tracking codes.
If it does not, the most common reasons are:
- - The code is inserted, but needs just a bit more time to get triggered
- - If you place the code in via Google Tag Manager, it may happen that the container remains unplushied. Double check that!
- - If any ad blocker is turned on in your browser, the “Check Install” button won’t work. The tracking code may still work though.
Offices
- Brandlift, Inc.5967 W. 3rd Str. # 201
Los Angeles, CA 90036 - Hungary OfficeLajos st. 130.
1036, Budapest

Get started now
We've made it fast and easy to experience Leadberry.
Start with a 7-day free trial account - register and set up Leadberry in a matter of minutes.
Start with a 7-day free trial account - register and set up Leadberry in a matter of minutes.
Sign up free
- - Sign up in 30 seconds.
- - No credit card required.
Download Leadberry's cold email checklist
to make your emails warm!